구현 참고사항
이 부분은 스택 재조정자(reconciler)에 대한 구현 참고사항입니다.
이는 매우 기술적이고 공개된 React API뿐만 아니라 어떻게 코어, 렌더러, 재조정자로 나누어지는지에 대해 깊은 이해가 필요합니다. 아직 React 코드 베이스에 친숙하지 않다면, 먼저 the codebase overview를 읽기를 바랍니다.
이는 React 컴포넌트와 인스턴스 그리고 엘리먼트 사이의 차이점을 이해한다고 가정합니다.
스택 재조정자는 React 15와 그 이전 버전에 사용되었습니다. 이는src/renderers/shared/stack/reconciler에 위치해 있습니다.
비디오: React 처음부터 만들기
Paul O’Shannessy는 이 문서에 크게 영감을 주었던 building React from scratch에 대해 이야기 하였습니다.
이 문서와 그의 말은 모두 현실 코드베이스의 단순화했기 때문에 여러분은 두 가지 모두 친숙해 짐으로써 더 깊은 이해를 가질 것입니다.
개요
재조정자는 공개된 API를 가지지 않습니다. React DOM과 React Native와 같은 렌더러는 사용자가 쓴, React 컴포넌트에 따른 사용자 인터페이스를 효율적으로 업데이트를 하기 위해서 사용합니다.
재귀적인 과정으로써의 마운트
여러분들이 컴포넌트를 처음 마운트할 때를 고려해 보겠습니다.
const root = ReactDOM.createRoot(rootEl);
root.render(<App />);root.render는 재조정자를 통해 <App />를 통과하게 할 것입니다. <App />은 React 엘리먼트이며, 렌더링 할 것을 설명해 놓은 것임을 기억합시다. 이것을 평범한 객체로 생각해도 좋습니다.
console.log(<App />);
// { type: App, props: {} }
재조정자가 App이 class인지 함수인지 확인합니다.
App이 함수라면, 재조정자는 렌더링 엘리먼트를 가져오기 위해 App(props)를 호출합니다.
App이 class면, 재조정자는 App을 new App(props)로 인스턴스화 하고, componentWillMount() 생명주기 메서드를 호출한 후, render() 메서드를 호출하여 렌더링 엘리먼트를 가져오게 할 것입니다.
어느 경우든, 재조정자는 App이 렌더링 되는 엘리먼트를 학습하게 됩니다.
이러한 과정은 재귀적입니다. App은 <Greeting />으로 렌더링 될 수도 있고, Greeting은 <Button /> 또는 다른 곳으로 렌더링 될 수 있습니다. 재조정자는 각 컴포넌트가 무엇을 렌더링하는지 학습할 때 사용자가 정의한 컴포넌트를 재귀적으로 조사합니다.
여러분들은 의사코드로 작성된 이 과정을 생각해봅시다.
function isClass(type) {
  // React.Component subclasses have this flag
  return (
    Boolean(type.prototype) &&
    Boolean(type.prototype.isReactComponent)
  );
}

// This function takes a React element (e.g. <App />)
// and returns a DOM or Native node representing the mounted tree.
function mount(element) {
  var type = element.type;
  var props = element.props;

  // We will determine the rendered element
  // by either running the type as function
  // or creating an instance and calling render().
  var renderedElement;
  if (isClass(type)) {
    // Component class
    var publicInstance = new type(props);
    // Set the props
    publicInstance.props = props;
    // Call the lifecycle if necessary
    if (publicInstance.componentWillMount) {
      publicInstance.componentWillMount();
    }
    // Get the rendered element by calling render()
    renderedElement = publicInstance.render();
  } else {
    // Component function
    renderedElement = type(props);
  }

  // This process is recursive because a component may
  // return an element with a type of another component.
  return mount(renderedElement);

  // Note: this implementation is incomplete and recurses infinitely!
  // It only handles elements like <App /> or <Button />.
  // It doesn't handle elements like <div /> or <p /> yet.
}

var rootEl = document.getElementById('root');
var node = mount(<App />);
rootEl.appendChild(node);
주의
이는 의사코드입니다. 실제 구현과 비슷하지 않습니다. 우리가 이 과정을 언제 멈출 지 결정을 한 적이 없기 때문에 스택 오버플로우 또한 야기할 수 있습니다.
위의 예에서 몇가지 핵심 아이디어를 요약해 봅시다.
- React 엘리먼트는 컴포넌트 타입(예:
App)과 props를 나타내는 일반 객체입니다. - 사용자 정의된 컴포넌트(예:
App)은 class이거나 함수일 수 있지만 모두 엘리먼트로 렌더링됩니다. - “마운팅”은 최상위 React 엘리먼트(예:
<App />)로부터 DOM 또는 네이티브 트리를 만드는 재귀적인 과정입니다.
호스트 엘리먼트 마운팅
이 과정은 우리가 스크린에 무언가를 렌더링하지 않는다면 무의미해집니다.
사용자 정의된(“composite”) 컴포넌트 외에도, React 엘리먼트는 플랫폼 특유의(“host”) 컴포넌트를 나타낼 수 있습니다. 예를 들어, Button은 렌더링된 메서드에서 <div />를 리턴할 수 있습니다.
엘리먼트의 type이 문자열인 경우, 우리는 호스트 엘리먼트로 처리합니다.
console.log(<div />);
// { type: 'div', props: {} }
이 곳에는 호스트 엘리먼트와 관련된 사용자 정의된 코드가 없습니다.
재조정자가 호스트 엘리먼트를 만나게 되면, 렌더러가 호스트 엘리먼트를 마운트할 수 있도록 관리합니다. 예를 들어, React DOM은 DOM 노드를 생성할 것입니다.
호스트 엘리먼트가 자식을 가지고 있으면, reconciler가 위와 동일한 알고리즘에 따라 재귀적으로 자식을 마운트합니다. 이는 자식이 호스트(like <div><hr /></div>)인지 사용자 정의(like <div><Button /></div>) 되었는지는 상관이 없습니다.
자식에 의해 만들어진 DOM 노드는 부모 DOM 노드로 추가되며, 재귀적으로 전체 DOM 구조가 조립됩니다.
주의
재조정자 자체는 DOM에 연결되어 있지 않습니다. 마운트의 정확한 결과(소스 코드에서 “mount image”로 불리는)는 렌더러에 의존하고, DOM 노드(React DOM), 문자열(React DOM Server) 또는 네이티브 뷰어(React Native)를 나타내는 숫자가 될 수도 있습니다.
호스트 엘리먼트를 다루기 위해 코드를 확장하는 경우, 다음과 같이 보일 수 있습니다.
function isClass(type) {
  // React.Component subclasses have this flag
  return (
    Boolean(type.prototype) &&
    Boolean(type.prototype.isReactComponent)
  );
}

// This function only handles elements with a composite type.
// For example, it handles <App /> and <Button />, but not a <div />.
function mountComposite(element) {
  var type = element.type;
  var props = element.props;

  var renderedElement;
  if (isClass(type)) {
    // Component class
    var publicInstance = new type(props);
    // Set the props
    publicInstance.props = props;
    // Call the lifecycle if necessary
    if (publicInstance.componentWillMount) {
      publicInstance.componentWillMount();
    }
    renderedElement = publicInstance.render();
  } else if (typeof type === 'function') {
    // Component function
    renderedElement = type(props);
  }

  // This is recursive but we'll eventually reach the bottom of recursion when
  // the element is host (e.g. <div />) rather than composite (e.g. <App />):
  return mount(renderedElement);
}

// This function only handles elements with a host type.
// For example, it handles <div /> and <p /> but not an <App />.
function mountHost(element) {
  var type = element.type;
  var props = element.props;
  var children = props.children || [];
  if (!Array.isArray(children)) {
    children = [children];
  }
  children = children.filter(Boolean);

  // This block of code shouldn't be in the reconciler.
  // Different renderers might initialize nodes differently.
  // For example, React Native would create iOS or Android views.
  var node = document.createElement(type);
  Object.keys(props).forEach(propName => {
    if (propName !== 'children') {
      node.setAttribute(propName, props[propName]);
    }
  });

  // Mount the children
  children.forEach(childElement => {
    // Children may be host (e.g. <div />) or composite (e.g. <Button />).
    // We will also mount them recursively:
    var childNode = mount(childElement);

    // This line of code is also renderer-specific.
    // It would be different depending on the renderer:
    node.appendChild(childNode);
  });

  // Return the DOM node as mount result.
  // This is where the recursion ends.
  return node;
}

function mount(element) {
  var type = element.type;
  if (typeof type === 'function') {
    // User-defined components
    return mountComposite(element);
  } else if (typeof type === 'string') {
    // Platform-specific components
    return mountHost(element);
  }
}

var rootEl = document.getElementById('root');
var node = mount(<App />);
rootEl.appendChild(node);
이는 동작하지만 실제로 재조정자가 구현되는 방식과는 거리가 멉니다. 누락된 핵심 요소는 업데이트에 대한 지원입니다.
내부 인스턴스의 소개
React의 가장 큰 특징은 모든 것을 다시 렌더링할 수 있고, DOM을 다시 생성하거나 상태를 초기화시키지 않아도 된다는 점입니다.
root.render(<App />);
// Should reuse the existing DOM:
root.render(<App />);
그러나, 위의 구현은 초기 트리를 어떻게 마운트 하는지만 알고 있습니다. 모든 publicInstance와 어떤 DOM node가 각 컴포넌트에 대응되는지와 같은 필수 정보를 담고 있지 않기 때문에 업데이트를 할 수 없습니다.
스택 재조정자의 코드베이스가 mount() 함수를 메서드로 만들고 class에 배치하여 위와 같은 문제를 해결합니다. 이러한 접근에는 여러 단점이 있고, 현재 우리는 재조정자를 다시 작성하고 있으며 스택 재조정자와는 다른 반대 방향으로 나아가고 있습니다. 그렇지만, 스택 재조정자가 지금 작동하는 방식입니다.
mountHost와 mountComposite 함수를 분리하는 것 대신에, 우리는 DOMComponent와 CompositeComponent 의 두 가지 class를 생성합니다.
두 class 모두 element를 받아들이는 생성자 뿐만 아니라 마운트된 노드를 반환해주는 mount() 메서드를 가지고 있습니다. 최상위 mount() 함수를 올바른 class로 인스턴스화 하는 팩토리로 대체합니다.
function instantiateComponent(element) {
  var type = element.type;
  if (typeof type === 'function') {
    // User-defined components
    return new CompositeComponent(element);
  } else if (typeof type === 'string') {
    // Platform-specific components
    return new DOMComponent(element);
  }
}
먼저, CompositeComponent을 구현한 것을 봅시다.
class CompositeComponent {
  constructor(element) {
    this.currentElement = element;
    this.renderedComponent = null;
    this.publicInstance = null;
  }

  getPublicInstance() {
    // For composite components, expose the class instance.
    return this.publicInstance;
  }

  mount() {
    var element = this.currentElement;
    var type = element.type;
    var props = element.props;

    var publicInstance;
    var renderedElement;
    if (isClass(type)) {
      // Component class
      publicInstance = new type(props);
      // Set the props
      publicInstance.props = props;
      // Call the lifecycle if necessary
      if (publicInstance.componentWillMount) {
        publicInstance.componentWillMount();
      }
      renderedElement = publicInstance.render();
    } else if (typeof type === 'function') {
      // Component function
      publicInstance = null;
      renderedElement = type(props);
    }

    // Save the public instance
    this.publicInstance = publicInstance;

    // Instantiate the child internal instance according to the element.
    // It would be a DOMComponent for <div /> or <p />,
    // and a CompositeComponent for <App /> or <Button />:
    var renderedComponent = instantiateComponent(renderedElement);
    this.renderedComponent = renderedComponent;

    // Mount the rendered output
    return renderedComponent.mount();
  }
}
이는 이전 mountComposite() 구현과 크게 다르지 않지만,this.currentElement, this.renderedComponent, this.publicInstance 와 같이 업데이트에 사용할 수 있도록 정보를 저장할 수 있습니다.
CompositeComponent의 인스턴스가 사용자가 제공하는 element.type의 인스턴스와 다르다는 것을 주의해주세요. CompositeComponent는 재조정자의 세부 구현 내용이고, 사용자에게는 노출되지 않습니다. 사용자 정의된 class는 element.type로부터 얻고, CompositeComponent가 이에 대한 인스턴스를 생성합니다.
혼동을 막기 위해, CompositeComponent와 DOMComponent의 인스턴스를 “내부 인스턴스”라 부릅니다. 이를 통해 몇 가지 오래 지속되는 데이터를 내부 인스턴스와 연결시킬 수 있습니다. 오직 렌더러와 재조정자만 내부 인스턴스를 알 수 있습니다.
반면, 사용자 정의된 class의 인스턴스를 “공개된 인스턴스(public instance)“라고 부릅니다. 공개된 인스턴스는 render()와 사용자가 직접 작성한 여러 메서드에서 this로 표시됩니다.
DOMComponent class의 mount() 메서드로 리팩터링된 mountHost() 메서드 또한 비슷하게 보입니다.
class DOMComponent {
  constructor(element) {
    this.currentElement = element;
    this.renderedChildren = [];
    this.node = null;
  }

  getPublicInstance() {
    // For DOM components, only expose the DOM node.
    return this.node;
  }

  mount() {
    var element = this.currentElement;
    var type = element.type;
    var props = element.props;
    var children = props.children || [];
    if (!Array.isArray(children)) {
      children = [children];
    }

    // Create and save the node
    var node = document.createElement(type);
    this.node = node;

    // Set the attributes
    Object.keys(props).forEach(propName => {
      if (propName !== 'children') {
        node.setAttribute(propName, props[propName]);
      }
    });

    // Create and save the contained children.
    // Each of them can be a DOMComponent or a CompositeComponent,
    // depending on whether the element type is a string or a function.
    var renderedChildren = children.map(instantiateComponent);
    this.renderedChildren = renderedChildren;

    // Collect DOM nodes they return on mount
    var childNodes = renderedChildren.map(child => child.mount());
    childNodes.forEach(childNode => node.appendChild(childNode));

    // Return the DOM node as mount result
    return node;
  }
}mountHost()로 리팩터링한 후의 주요 차이점은 this.node와 내부 DOM 컴포넌트 인스턴스와 연결된 this.renderedChildren을 유지한다는 것입니다. 향후 non-destructive 업데이트 적용에도 활용할 예정입니다.
결과적으로, 복합 또는 호스트인 각 내부 인스턴스는 이제 자식 내부 인스턴스를 가리킵니다. 이를 시각화하기 위해 함수 <App> 컴포넌트가 <Button> class 컴포넌트를 렌더링하고 Button class가 <div>를 렌더링하는 경우 내부 인스턴스 트리는 다음과 같이 보일 것입니다.
[object CompositeComponent] {
  currentElement: <App />,
  publicInstance: null,
  renderedComponent: [object CompositeComponent] {
    currentElement: <Button />,
    publicInstance: [object Button],
    renderedComponent: [object DOMComponent] {
      currentElement: <div />,
      node: [object HTMLDivElement],
      renderedChildren: []
    }
  }
}
DOM에서는 <div>만 보일 것입니다. 그러나 내부 인스턴스 트리에는 복합적인 것과 호스트 내부 인스턴스가 모두 포함되어 있습니다.
복합 내부 인스턴스는 다음을 저장해야 합니다.
- 현재 엘리먼트
- 엘리먼트 타입이 클래스라면 public 인스턴스
- 단일 렌더링된 내부 인스턴스.
DOMComponent또는CompositeComponent가 될 수 있습니다.
호스트 내부 인스턴스는 다음을 저장해야 합니다.
- 현재 엘리먼트
- DOM 노드
- 모든 자식 내부 인스턴스. 각 인스턴스는
DOMComponent또는CompositeComponent일 수 있습니다.
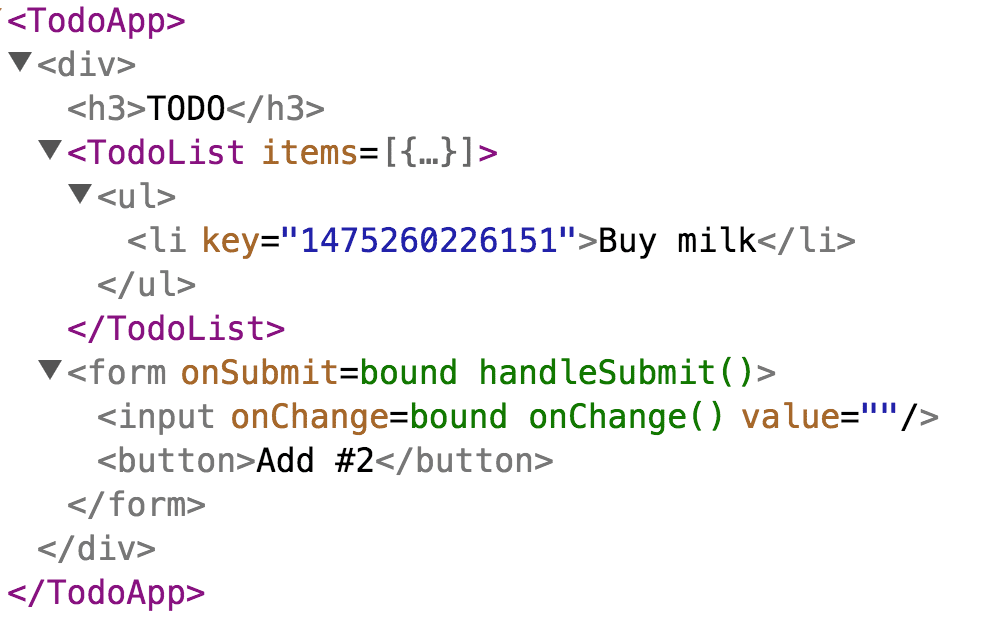
더 복잡한 애플리케이션에서 내부 인스턴스 트리가 어떻게 구성되는지 상상하기 어려울 경우, React DevTools는 호스트 인스턴스를 회색 그리고 복합 인스턴스를 보라색으로 강조하므로 가까운 근사치를 줄 수 있습니다.
리팩토링을 완료하기 위해 전체 트리를 컨테이너 노드와 공개 인스턴스에 마운트하는 기능을 소개합니다.
function mountTree(element, containerNode) {
  // Create the top-level internal instance
  var rootComponent = instantiateComponent(element);

  // Mount the top-level component into the container
  var node = rootComponent.mount();
  containerNode.appendChild(node);

  // Return the public instance it provides
  var publicInstance = rootComponent.getPublicInstance();
  return publicInstance;
}

var rootEl = document.getElementById('root');
mountTree(<App />, rootEl);
마운트 해제
이제 자식들과 DOM 노드를 유지하는 내부 인스턴스를 가지고 있으므로, 마운트 해제를 구현할 수 있습니다. 복합 컴포넌트의 경우, 마운트 해제가 생명주기 메서드를 재귀적으로 호출합니다.
class CompositeComponent {

  // ...

  unmount() {
    // Call the lifecycle method if necessary
    var publicInstance = this.publicInstance;
    if (publicInstance) {
      if (publicInstance.componentWillUnmount) {
        publicInstance.componentWillUnmount();
      }
    }

    // Unmount the single rendered component
    var renderedComponent = this.renderedComponent;
    renderedComponent.unmount();
  }
}DOMComponent의 경우 마운트 해제는 각 자식에게 마운트 해제를 지시합니다.
class DOMComponent {

  // ...

  unmount() {
    // Unmount all the children
    var renderedChildren = this.renderedChildren;
    renderedChildren.forEach(child => child.unmount());
  }
}
실제로 DOM 컴포넌트를 마운트 해제하면 이벤트 리스너가 제거되고 캐시가 일부 지워지지만 이러한 자세한 내용은 넘어가겠습니다.
이제 ReactDOM.unmountComponentAtNode()와 유사한 unmountTree(containerNode)라는 새로운 최상위 함수를 추가할 수 있습니다.
function unmountTree(containerNode) {
  // Read the internal instance from a DOM node:
  // (This doesn't work yet, we will need to change mountTree() to store it.)
  var node = containerNode.firstChild;
  var rootComponent = node._internalInstance;

  // Unmount the tree and clear the container
  rootComponent.unmount();
  containerNode.innerHTML = '';
}
이것이 작동하려면 DOM 노드에서 내부 루트 인스턴스를 읽어야 합니다. _internalInstance 속성을 루트 DOM 노드에 추가하도록 mountTree()를 수정합니다. 또한 mountTree()를 가르쳐 기존 트리를 여러 번 파괴할 수 있도록 할 것입니다.
function mountTree(element, containerNode) {
  // Destroy any existing tree
  if (containerNode.firstChild) {
    unmountTree(containerNode);
  }

  // Create the top-level internal instance
  var rootComponent = instantiateComponent(element);

  // Mount the top-level component into the container
  var node = rootComponent.mount();
  containerNode.appendChild(node);

  // Save a reference to the internal instance
  node._internalInstance = rootComponent;

  // Return the public instance it provides
  var publicInstance = rootComponent.getPublicInstance();
  return publicInstance;
}
이제 mountTree() 또는 unmountTree()를 반복적으로 실행하면 오래된 트리가 제거되고 컴포넌트에서 componentWillUnmount() 생명주기 메서드가 실행됩니다.
업데이트
이전 섹션에서, 마운트 해제를 구현했습니다. 그러나 각각의 prop 변화가 전체 트리를 마운트 해제하고 마운트한다면 React는 그다지 유용하지 않을 것입니다. 조정자의 목표는 DOM과 상태를 보전하기 위해 가능한 경우 기존 인스턴스를 재사용 하는 것입니다.
var rootEl = document.getElementById('root');

mountTree(<App />, rootEl);
// Should reuse the existing DOM:
mountTree(<App />, rootEl);
내부 인스턴스 계약을 메서드 하나를 추가해서 확장할 것입니다. mount()와 unmount()외에도 , DOMComponent CompositeComponent 모두 receive(nextElement)라고 불리는 새로운 메서드를 구현합니다.
class CompositeComponent {
  // ...

  receive(nextElement) {
    // ...
  }
}

class DOMComponent {
  // ...

  receive(nextElement) {
    // ...
  }
}nextElement에 의해 제공된 설명을 통해 컴포넌트(또한 어떠한 자식)를 최신 상태로 만들기 위해 필요한 모든 것을 하는게 이 메서드의 일입니다.
실제로 일어나는 일은 내부 트리를 반복적으로 순회하고 각 내부 인스턴스가 업데이트를 받도록 하는 것이지만, 이 부분은 종종 “가상 DOM 비교”로 설명됩니다.
복합 컴포넌트의 업데이트
복합 컴포넌트가 새로운 엘리먼트를 받으면 componentWillUpdate() 생명주기 메서드를 실행합니다.
그런 다음 새로운 props와 함께 컴포넌트를 다시 렌더링 하고, 다음 렌더링 된 엘리먼트를 얻습니다.
class CompositeComponent {

  // ...

  receive(nextElement) {
    var prevProps = this.currentElement.props;
    var publicInstance = this.publicInstance;
    var prevRenderedComponent = this.renderedComponent;
    var prevRenderedElement = prevRenderedComponent.currentElement;

    // Update *own* element
    this.currentElement = nextElement;
    var type = nextElement.type;
    var nextProps = nextElement.props;

    // Figure out what the next render() output is
    var nextRenderedElement;
    if (isClass(type)) {
      // Component class
      // Call the lifecycle if necessary
      if (publicInstance.componentWillUpdate) {
        publicInstance.componentWillUpdate(nextProps);
      }
      // Update the props
      publicInstance.props = nextProps;
      // Re-render
      nextRenderedElement = publicInstance.render();
    } else if (typeof type === 'function') {
      // Component function
      nextRenderedElement = type(nextProps);
    }

    // ...
그 다음, 렌더링된 엘리먼트의 type을 살펴 볼 수 있습니다. 마지막 렌더링 이후 type이 변경되지 않았다면 아래 컴포넌트도 업데이트할 수 있습니다.
예를 들어, 처음에 <Button color="red" />를 반환하고 두 번째로 <Button color="blue" />를 반환했다면, 대응되는 내부 인스턴스에게 다음 엘리먼트를 receive()하라고 말해줄 수 있습니다.
    // ...

    // If the rendered element type has not changed,
    // reuse the existing component instance and exit.
    if (prevRenderedElement.type === nextRenderedElement.type) {
      prevRenderedComponent.receive(nextRenderedElement);
      return;
    }

    // ...
그러나, 다음 렌더링된 엘리먼트가 이전에 렌더링된 엘리먼트와 다른 type을 가지고 있다면, 우리는 내부 인스턴스를 업데이트할 수 없습니다. <button>은 <input>이 될 수 없습니다.
대신에, 기존 내부 인스턴스를 마운트 해제 하고 렌더링된 엘리먼트 타입에 해당하는 새 인스턴스를 마운트 해야 합니다. 예를 들어 이전에 <button />을 렌더링한 컴포넌트가 <input />을 렌더링할 때 다음과 같이 됩니다.
    // ...

    // If we reached this point, we need to unmount the previously
    // mounted component, mount the new one, and swap their nodes.

    // Find the old node because it will need to be replaced
    var prevNode = prevRenderedComponent.getHostNode();

    // Unmount the old child and mount a new child
    prevRenderedComponent.unmount();
    var nextRenderedComponent = instantiateComponent(nextRenderedElement);
    var nextNode = nextRenderedComponent.mount();

    // Replace the reference to the child
    this.renderedComponent = nextRenderedComponent;

    // Replace the old node with the new one
    // Note: this is renderer-specific code and
    // ideally should live outside of CompositeComponent:
    prevNode.parentNode.replaceChild(nextNode, prevNode);
  }
}
이를 요약하면 복합 컴포넌트가 새로운 엘리먼트를 수신할 때, 해당 컴포넌트는 렌더링된 내부 인스턴스에 업데이트를 넘기거나, 마운트 해제 하여 그 위치에 컴포넌트를 마운트 할 수 있습니다.
엘리먼트를 받는 대신 컴포넌트를 다시 마운트하는 또 다른 조건이 있는데, 엘리먼트의 key가 변경될 때입니다. 이미 복잡한 자습서를 더 복잡하게 만들기 때문에 이 문서에서 key 처리에 대해서는 논의하지 않습니다.
특정 플랫폼 관련 노드를 찾아 업데이트하는 동안 교체할 수 있도록 내부 인스턴스 계약에 getHostNode()라는 메서드를 추가해야 한다는 점을 주의해주세요. 구현은 두 클래스 모두에서 간단합니다.
class CompositeComponent {
  // ...

  getHostNode() {
    // Ask the rendered component to provide it.
    // This will recursively drill down any composites.
    return this.renderedComponent.getHostNode();
  }
}

class DOMComponent {
  // ...

  getHostNode() {
    return this.node;
  }
}
호스트 컴포넌트 업데이트
DOMComponent와 같은 호스트 컴포넌트 구현은 다르게 업데이트 됩니다. 엘리먼트를 수신할 때 특정 플랫폼 관련 뷰를 업데이트해야 합니다. React DOM의 경우 DOM 특성을 업데이트 하는 것을 의미합니다.
class DOMComponent {
  // ...

  receive(nextElement) {
    var node = this.node;
    var prevElement = this.currentElement;
    var prevProps = prevElement.props;
    var nextProps = nextElement.props;
    this.currentElement = nextElement;

    // Remove old attributes.
    Object.keys(prevProps).forEach(propName => {
      if (propName !== 'children' && !nextProps.hasOwnProperty(propName)) {
        node.removeAttribute(propName);
      }
    });
    // Set next attributes.
    Object.keys(nextProps).forEach(propName => {
      if (propName !== 'children') {
        node.setAttribute(propName, nextProps[propName]);
      }
    });

    // ...
그리고 나서 호스트 컴포넌트는 자식들을 업데이트 할 필요가 있습니다. 복합 컴포넌트와 다르게 둘 이상의 자식이 포함될 수 있습니다.
단순화된 예시에서 내부 인스턴스 배열을 사용하며, 수신된 type과 이전 type의 일치 여부에 따라 내부 인스턴스를 업데이트하거나 교체하는 방식으로 순회합니다. 실제 재조정자는 삽입과 삭제 외에 엘리먼트의 key를 가진 뒤 변경 여부를 추적하지만 여기서는 관련 코드를 생략했습니다.
리스트에서 자식에 대한 DOM 연산을 수집하여 일괄적으로 실행할 수 있도록 합니다.
    // ...

    // These are arrays of React elements:
    var prevChildren = prevProps.children || [];
    if (!Array.isArray(prevChildren)) {
      prevChildren = [prevChildren];
    }
    var nextChildren = nextProps.children || [];
    if (!Array.isArray(nextChildren)) {
      nextChildren = [nextChildren];
    }
    // These are arrays of internal instances:
    var prevRenderedChildren = this.renderedChildren;
    var nextRenderedChildren = [];

    // As we iterate over children, we will add operations to the array.
    var operationQueue = [];

    // Note: the section below is extremely simplified!
    // It doesn't handle reorders, children with holes, or keys.
    // It only exists to illustrate the overall flow, not the specifics.

    for (var i = 0; i < nextChildren.length; i++) {
      // Try to get an existing internal instance for this child
      var prevChild = prevRenderedChildren[i];

      // If there is no internal instance under this index,
      // a child has been appended to the end. Create a new
      // internal instance, mount it, and use its node.
      if (!prevChild) {
        var nextChild = instantiateComponent(nextChildren[i]);
        var node = nextChild.mount();

        // Record that we need to append a node
        operationQueue.push({type: 'ADD', node});
        nextRenderedChildren.push(nextChild);
        continue;
      }

      // We can only update the instance if its element's type matches.
      // For example, <Button size="small" /> can be updated to
      // <Button size="large" /> but not to an <App />.
      var canUpdate = prevChildren[i].type === nextChildren[i].type;

      // If we can't update an existing instance, we have to unmount it
      // and mount a new one instead of it.
      if (!canUpdate) {
        var prevNode = prevChild.getHostNode();
        prevChild.unmount();

        var nextChild = instantiateComponent(nextChildren[i]);
        var nextNode = nextChild.mount();

        // Record that we need to swap the nodes
        operationQueue.push({type: 'REPLACE', prevNode, nextNode});
        nextRenderedChildren.push(nextChild);
        continue;
      }

      // If we can update an existing internal instance,
      // just let it receive the next element and handle its own update.
      prevChild.receive(nextChildren[i]);
      nextRenderedChildren.push(prevChild);
    }

    // Finally, unmount any children that don't exist:
    for (var j = nextChildren.length; j < prevChildren.length; j++) {
      var prevChild = prevRenderedChildren[j];
      var node = prevChild.getHostNode();
      prevChild.unmount();

      // Record that we need to remove the node
      operationQueue.push({type: 'REMOVE', node});
    }

    // Point the list of rendered children to the updated version.
    this.renderedChildren = nextRenderedChildren;

    // ...
마지막 단계로, DOM 연산을 실행합니다. 또한, 실제 재조정자 코드는 이동도 처리하기 때문에 매우 복잡합니다.
    // ...

    // Process the operation queue.
    while (operationQueue.length > 0) {
      var operation = operationQueue.shift();
      switch (operation.type) {
      case 'ADD':
        this.node.appendChild(operation.node);
        break;
      case 'REPLACE':
        this.node.replaceChild(operation.nextNode, operation.prevNode);
        break;
      case 'REMOVE':
        this.node.removeChild(operation.node);
        break;
      }
    }
  }
}
그리고 그것은 호스트 컴포넌트를 업데이트하기 위한 것입니다.
최상위 업데이트
이제 CompositeComponent와 DOMComponent 모두 receive(nextElement) 메서드를 구현하므로 엘리먼트 type이 이전과 같을 때 사용하도록 최상위 mountTree() 함수를 변경할 수 있습니다.
function mountTree(element, containerNode) {
  // Check for an existing tree
  if (containerNode.firstChild) {
    var prevNode = containerNode.firstChild;
    var prevRootComponent = prevNode._internalInstance;
    var prevElement = prevRootComponent.currentElement;

    // If we can, reuse the existing root component
    if (prevElement.type === element.type) {
      prevRootComponent.receive(element);
      return;
    }

    // Otherwise, unmount the existing tree
    unmountTree(containerNode);
  }

  // ...

}
이제 동일한 타입으로 mountTree()를 두 번 호출해도 파괴적이지 않습니다.
var rootEl = document.getElementById('root');

mountTree(<App />, rootEl);
// Reuses the existing DOM:
mountTree(<App />, rootEl);
These are the basics of how React works internally.
우리가 놓치고 간 것들
이 문서는 실제 코드베이스에 비해 단순합니다. 우리가 다루지 않은 몇 가지 중요한 측면들이 있습니다.
- 컴포넌트는
null을 렌더링할 수 있으며, 재조정자는 배열 및 렌더링된 출력에서 “빈 슬롯”을 처리할 수 있습니다. - 재조정자는 또한 엘리먼트에서
key를 읽고, 이를 사용하여 배열의 엘리먼트와 일치하는 내부 인스턴스를 설정합니다. 실제 React 구현의 많은 복잡성은 이와 관련이 있습니다. - 복합 및 호스트 내부 인스턴스 class 외에도 “text” 및 “empty” 컴포넌트에 대한 class도 있습니다. 텍스트 노드와
null을 렌더링해서 얻는 “empty slots”을 나타냅니다. - 렌더러는 주입을 사용하여 재조정자에게 호스트 내부 class를 전달합니다. 예를 들어, React DOM은 재조정자에게 호스트 내부 인스턴스 구현으로
ReactDOMComponent를 사용하도록 지시합니다. - 자식 목록을 업데이트하는 논리는 React DOM과 React Native에서 호스트 내부 인스턴스 class 구현에 사용되는
ReactMultiChild라는 mixin으로 추출됩니다. - 재조정자는 복합 컴포넌트의
setState()에 대한 지원도 구현합니다. 이벤트 핸들러 내부의 여러 업데이트가 단일 업데이트로 일괄 처리됩니다. - 재조정자는 또한 복합 컴포넌트 및 호스트 노드에 ref를 연결 및 분리하는 작업을 수행합니다.
componentDidMount()및componentDidUpdate()와 같이 DOM이 준비된 후 호출되는 생명주기 메서드는 “콜백 큐”로 수집되어 단일 배치로 실행됩니다.- React는 현재 업데이트에 대한 정보를 “트랜잭션”이라고 하는 내부 객체에 넣습니다. 트랜잭션은 보류 중인 생명주기 메서드 대기열의 추적, 현재 DOM 중첩에 대한 경고 및 특정 업데이트에 “전역적인” 다른 모든 것을 추적하는 데 유용합니다. 또한 트랜잭션는 업데이트 후 React가 모든 것을 정리하도록 보장합니다. 예를 들어 React DOM에서 제공하는 트랜잭션 class는 업데이트 후 입력 선택을 복원합니다.
코드에 대해 알아보기
ReactMount는 이 자습서에서mountTree()및unmountTree()와 같은 코드가 사용되는 곳입니다. 최상위 컴포넌츠의 마운트과 마운트 해제을 관리합니다.ReactNativeMount는 React Native 아날로그입니다.ReactDOMComponent는 본 자습서의DOMComponent와 동등합니다. React DOM 렌더러에 대한 호스트 컴포넌트 class를 구현합니다.ReactNativeBaseComponent는 React Native 아날로그 입니다.ReactCompositeComponent는 본 자습서의CompositeComponent와 동등한 것입니다. 사용자 정의 컴포넌트 호출 및 상태 유지 관리 작업을 처리합니다.instantiateReactComponent에는 엘리먼트에 대해 구성할 올바른 내부 인스턴스 class를 선택하는 스위치가 포함되어 있습니다. 이 자습서에서는instantiateComponent()와 같습니다.ReactReconciler는mountComponent(),receiveComponent()및unmountComponent()메서드가 있는 wrapper입니다. 내부 인스턴스에 대한 기본 구현을 호출하지만, 또한 모든 내부 인스턴스 구현에 의해 공유되는 그들 주변의 일부 코드를 포함합니다.ReactChildReconciler는 자식의 엘리먼트key에 따라 자식을 마운트, 업데이트 및 마운트 해제하는 코드를 구현합니다.ReactMultiChild는 자식 삽입, 삭제 및 렌더러와 독립적으로 이동하기 위한 작업 대기열 처리를 구현합니다.- 레거시를 위해 react codebase에
mount(),receive()및unmount()를 실제로 각각mountComponent(),receiveComponent(),unmountComponent()라고 불러지지만, 엘리먼트를 받습니다. - 내부 인스턴스의 속성은
_currentElement와 같이 밑줄로 시작합니다. 코드베이스 전체에 걸쳐 읽기 전용 퍼블릭 필드로 간주됩니다.
미래의 방향
스택 재조정자는 작업을 중단하거나 청크로 분할할 수 없는 것과 같은 타고난 한계가 있습니다. 완전히 다른 아키텍처를 가진 새로운 Fiber 재조정자에 대한 작업이 진행 중입니다. 향후, 스택 재조정자를 이것으로 대체하려고 하지만, 현재는 피쳐 패리티와는 거리가 멉니다.
다음 단계
다음 섹션을 읽고 React 개발에 사용하는 설계 원칙에 대해 알아봅시다.